Friday

123 Count Tool

What is “123 Count Tool”?

“123 Count Tool” is used for specify any sign or part of image or objects by used 123 numbers. We can group same color’s sign by numbers.

How to work “123 Count Tool”?
At first open a picture in where present huge colors.
Select “123 Count Tool” from toolbox.


You can choose group.
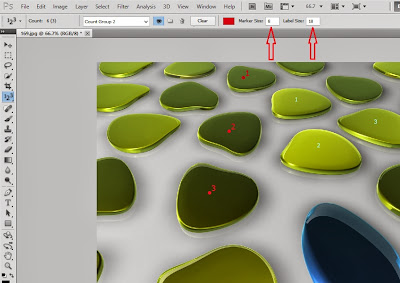
You can change color, marker size and label size as your wise.


Now click on relative colors.
If you can specify other colors, click on the “Create a New Count Group” button.


Change color from above toolbar.
Now click on the others related color.


You can change Marker size and Label size from above toolbar.


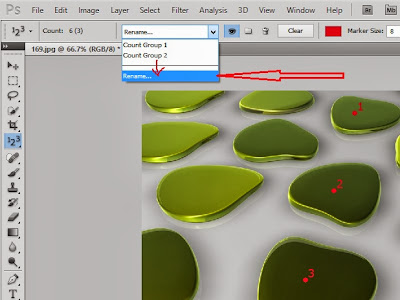
You can rename group by click on rename option from above toolbar.


If you can clean numbers by click on “Clean” button from above toolbar.


So “123 Count Tool” is very simple tool and try it.

Thursday

Content-Aware Move tool


This tool uses if you want to cut/copy any image spot or sign or seal to anywhere in the image.

How to use of the Content-Aware Move tool:
Using of the Content-Aware Move tool is very easy. Follow the example to understand this tool.

Example:
At first open the Photoshop upgrade version i.e. CS5 or CS6.
Open an image in which you need edit.
Select the “Content-Aware Move” tool from toolbar.


Select “Move” option from above toolbar in “Mode” area.


Select any spot or sign or seal of the image.


Drag selected area in suitable/desirable area of the image.


You will see the spot or sign or seal are moved.


If you copy the spot or sign or seal, select “Extend” option from “Mode” area.
Then select any spot or sign or seal of the image.


Drag selected area in suitable/desirable area of the image.


You will see the spot or sign or seal are copied. Try to more copy.


Perspective Crop tool


This tool uses if you want to cut/crop any angle image as without angle image.

How to use of the Perspective Crop tool:
Using of the Perspective tool is very easy. Follow the example to understand this tool. Its work like as Crop tool. We use it to see an angle image to normal image.

Example:
At first open the Photoshop upgrade version i.e. CS5 or CS6.
Open an angle image which you see a without angle.


Select the “Perspective Crop” tool from toolbar.


Select by the click in all corner of the image of angle area.


Press Enter key or click on tick mark sign.


Spot Healing Brush tool


This tool uses if you want to invisible/vanish/remove any spot or any part of image area.

How to use of the Spot Healing Brush tool:
Using of the Spot Healing Brush tool is very easy. Follow the example to understand this tool. Its work like as Stamp tool although using of the Spot Healing brush is very effective to remove any kind of spot from image.

Example:
-At first open the Photoshop upgrade version i.e. CS5 or CS6.
-Open an image with spot which you need to remove.


-Select the “Spot Healing Brush” tool from toolbar.


-Select brush size and mode.


-Then only drag on the spot for vanishing.


-You will see, spot of the image is not in here. 


-Another example:


New Image


Vanish all spot

Wednesday

Ruler tool / Measure tool


This tool uses if you want to measure one shape/object to another shape/object in a picture.  So it’s only use to calculate distance between two shape/objects. “Measure” tool is use in Photoshop old version and “Ruler” tool is use in Adobe Photoshop Upgrade Version. But functions are same.

How to use of the Ruler tool:
Using of the Ruler tool is very easy. Follow the example to understand this tool.
Example:
At first open the Photoshop old version or  upgrade version i.e. CS5 or CS6.
-Click to the “Edit” menu.
-Select “Preferences” then click to “Units & Rulers” option.
-Choose your measurement unit (i.e. Inches, centimeter, and millimeter) from “Rulers” drop-down option in Units area.
-Create a new file where you want to calculate distance between two shapes.


-Click to “View” menu then click to “Rulers”. This Rulers or Measure and Ruler are not same. We use Rulers for view a scale and we use Ruler  or Measure for calculate measure.


-Draw two shapes or object.


-Select the “Ruler” or “Measure” tool from tool bar.

"Ruler" tool in Adobe Photoshop Upgrade version

"Measure" tool in Adobe Photoshop Old version

-Drag one shape to another.
-See distance value in above toolbar beside “W” and “H” letter as inches or millimeter or which you select from Edit menu.


-“W” means width.
-If you drag Ruler tool left to right or right to left, the distance will showed beside “W”.
-“H” means height.

-If you drag Ruler tool up to down or down to up, the distance will showed beside “H”.


Rotate View tool


We use the “Rotate View tool” only rotate any image to work perfectly. You can’t save this image with rotation. Because it is used only for comfort to work in the stage.

How to use of the Rotate View tool:
Using of the Rotate View tool is very easy. Follow the example to understand this tool.
Example:
At first open the Photoshop upgrade version i.e. CS5 or CS6.
Open a picture which you need to rotate.
Select Rotate View tool.


Now, try to rotate it by mouse drag.


You also set angle of rotation of image.
To set angle, write angle value to “Rotate Angle” box on the above tool bar.
Press Enter.


Now, you can work in the rotate picture.

Red Eye tool


We use the “Red Eye tool” only remove red area by black color of eye. It’s work like as color replacement tool.

How to use of the Red Eye tool:
Using of the Red Eye tool is very easy. Follow the example to understand this tool.

Example:
At first open the Photoshop upgrade version i.e. CS5 or CS6.
Open a human picture with red eye.
You can zoom in this picture to edit perfectly.


Select the Red Eye tool from tool bar.


Then just click on the red eye of the human.


You will see red color replace in black color.


Now you can save this image.

Quick Selection tool


We use the Quick selection to select relevant area of image quickly for editing selected area perfectly. It’s work like as Magic Wand tool.

How to use of the Quick Selection tool:
Using of the Quick Selection tool is very easy. Follow the example to understand this tool.

Example:
At first open the Photoshop upgrade version i.e. CS5 or CS6.
Open a picture which you need to edit.
Select the Quick Selection tool from tool bar.
Select “Add to selection” tool from above tool bar.


Then just drag in desirable image areas which area you need to edit.


You can use “Subtract from selection” tool from above tool bar for removing some unexpected area.


Now click “Image” menu.
Select “Adjustments” option then select any option for edit selected area.


Select “Brightness & contrast” if you want to edit brightness & contrast of the selected area.
And change the value of the “Brightness & contrast” option.
Click to OK.


At last, click to “Select” menu.
Click to “Deselect” for deselect selected image area.
Or press Ctrl + D for deselect.


Now you can save this image.