We use the Pen tool to draw anything accurately. At first, we create a path then convert it to a selection or shape for drawing.
How to use of the Pen tool:
Using of the Pen tool is very easy.
Example:
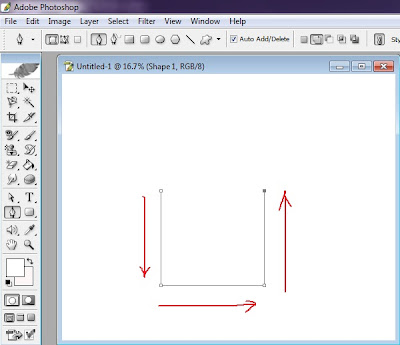
Now, we will create a rectangle.
-At first, creates a new page.
-Click anywhere on the page/stage.
-Again, click to create another point below the first point.

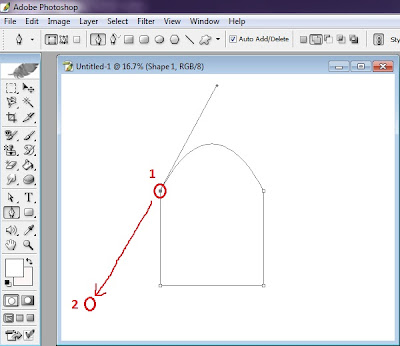
-Finally click to the first point and suddenly drag left below as picture below to create a curved line.

-Now, we will set a color in the created path.
-Click on the “Fore Ground Color” icon.
-Then click on the path.
-Our path will hide.
-Now, we will set stroke for the Sack.
Another example:
-So this is a Path.
-Then click on the new first point and drag to right side.
Freeform Pen tool:
This tool is same as Pen tool but it is very easy. We can create any path easily by dragging mouse.
Example:
-At first, creates a new page.
-Draw on the page as Pencil tool.
-Now, we will set a color in the created path.
-Click on the “Fore Ground Color” icon.
-Then click on the path.
-Our path will hide.
-Now, we will set stroke for the Sack.
Add Anchor Point tool:
We use this tool only add anchor point on the Path.
Example:
-At first, creates a new page.
Now, we can modify Path by clicked on the new points and dragged.
Delete Anchor Point tool:
This tool is used for deleting any anchor point from Path.
Example:
-At first, creates a new page.
-Select the Pen tool.
-Select the “Delete Anchor Point tool”.
-Click on the rectangular path.
We use the Convert tool to break a line and bend a line to draw effectively.
Example:
-At first, create a new page.
-Select the Pen tool.
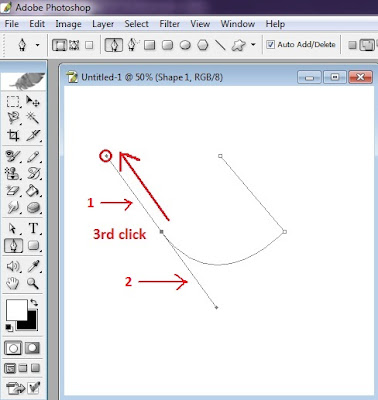
-Accordingly, create another point and suddenly drag up-left as picture below to create a curved line.

-We will see another two lines.
-These lines are used to curve any line.
When we draw first and second point, we can draw straight line.
But at now, we cannot draw straight line.
For this reason, we will use the “Convert Point tool”.


দারুণ!
ReplyDelete